

Free Azure Project: Build a Secure AI Foundation
The Future of AI Development is Here – Microsoft Build 2025


Microsoft Build 2025
Microsoft just dropped over 50 groundbreaking announcements about AI and the future of cloud computing. Understanding these innovations will put you light years ahead of other developers, but before you can leverage any of it, you need the crucial foundations.
Azure isn't just expanding as a "platform that enables open scalable, agentic web" – it's expanding the opportunity for developers like you.
Microsoft is doubling down on what matters most for developers building any application:
Trust & Security
Compliance
Audibility
Data Residency
Building intelligent agents and deploying AI models sounds exciting, but they all require infrastructure that's secure, scalable, and ready to handle modern AI workloads. Here's the Azure project that's going to solve that foundation problem for you.
Skip straight to the project below, or watch the full opening keynote here:
Build Your Secure Azure Foundation: Step-by-Step
What you're configuring is pretty basic stuff - essentially the networking plumbing that everything else sits on top of. But here's the thing: without this foundation, nothing else works. You're about to open the door to a whole new world of developer possibilities.
Step 1: Get Started with Azure
Sign up for a free Azure account if you haven’t already. This gives you access to core services with limited usage for 12 months and always free services.
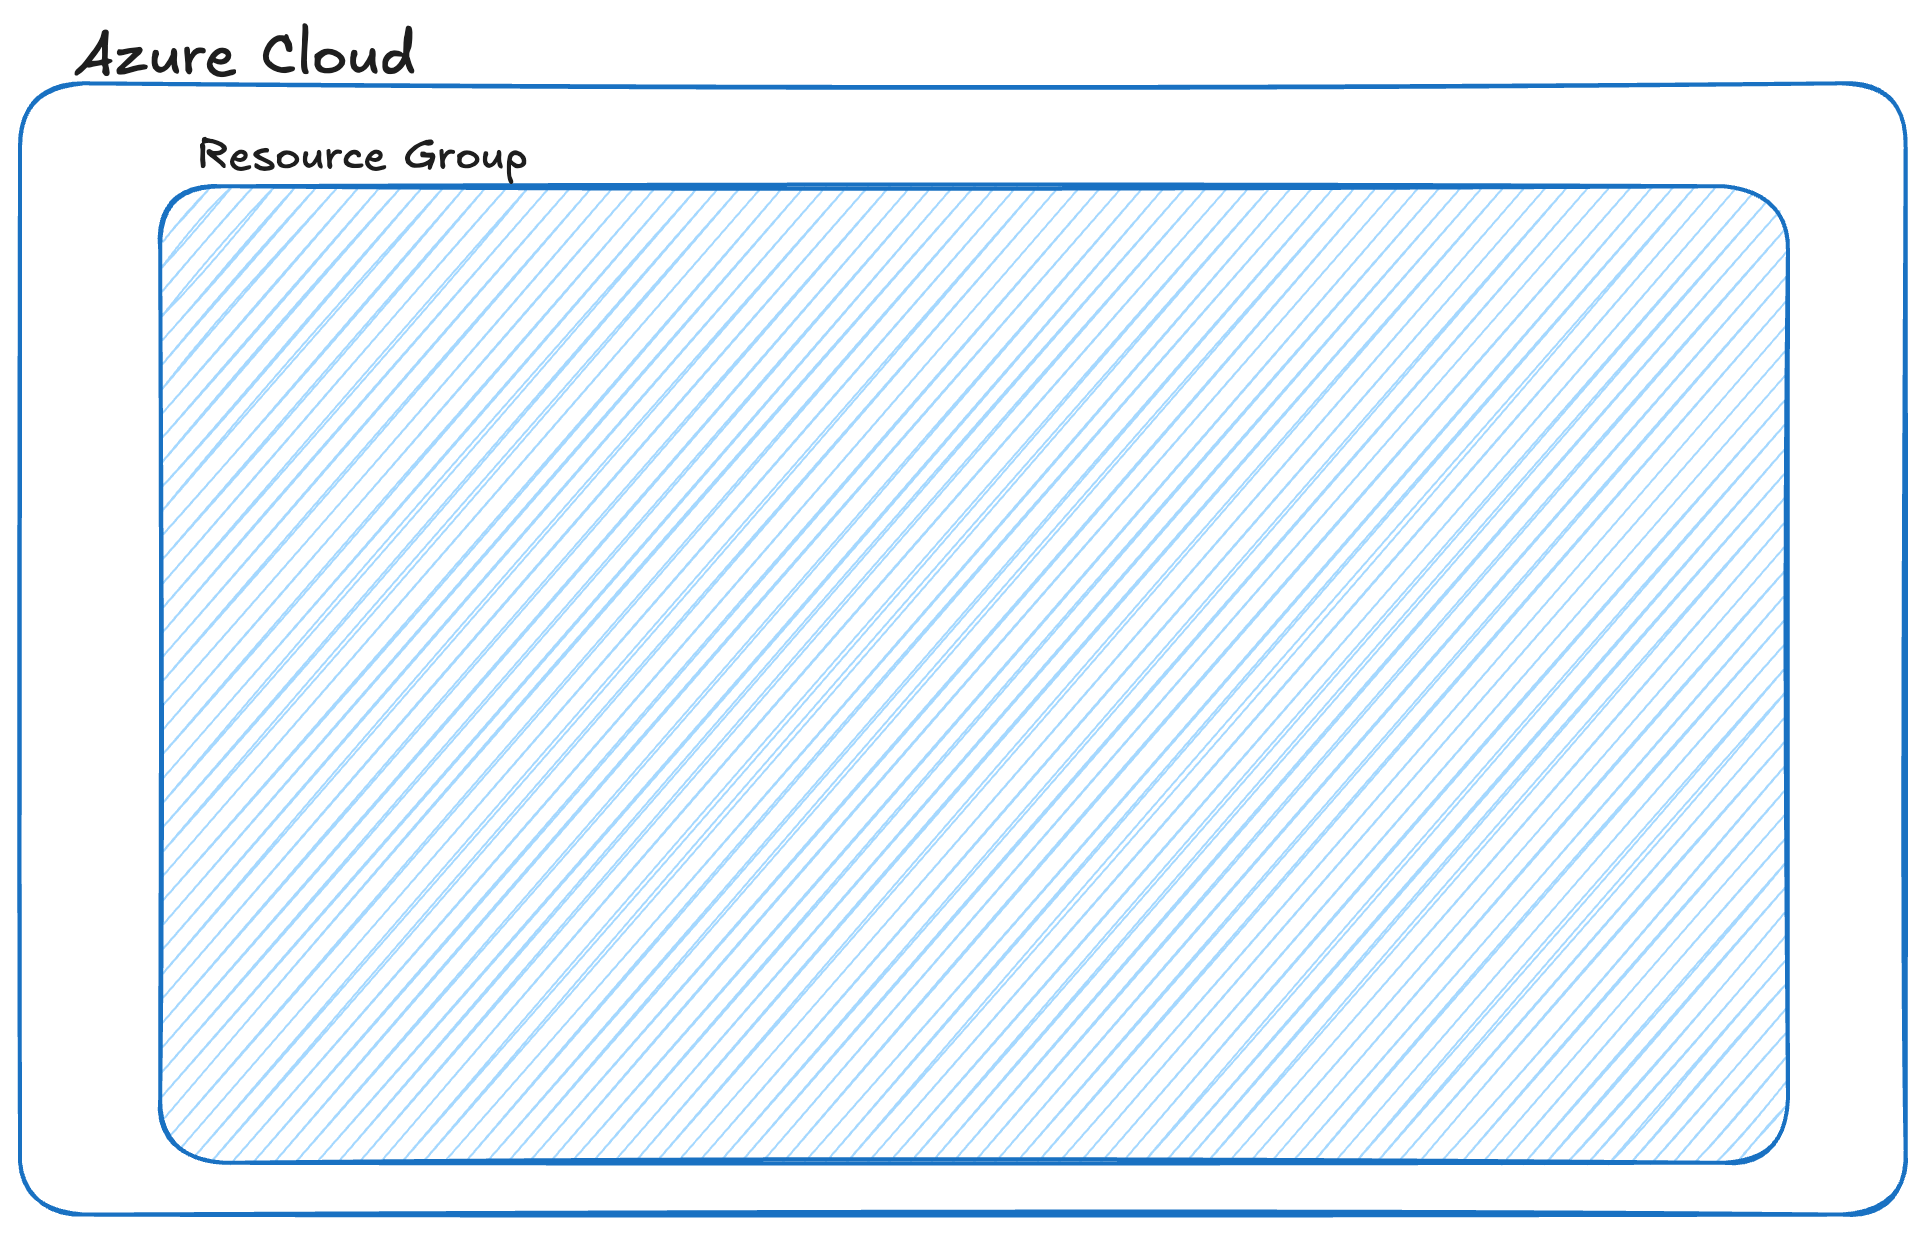
Step 2: Create a Resource Group
Create a Resource Group – a logical container in Azure that holds all the related resources for your solution. It helps with organising and managing resources by lifecycle and permissions.
🛠️ Resource Groups » Create
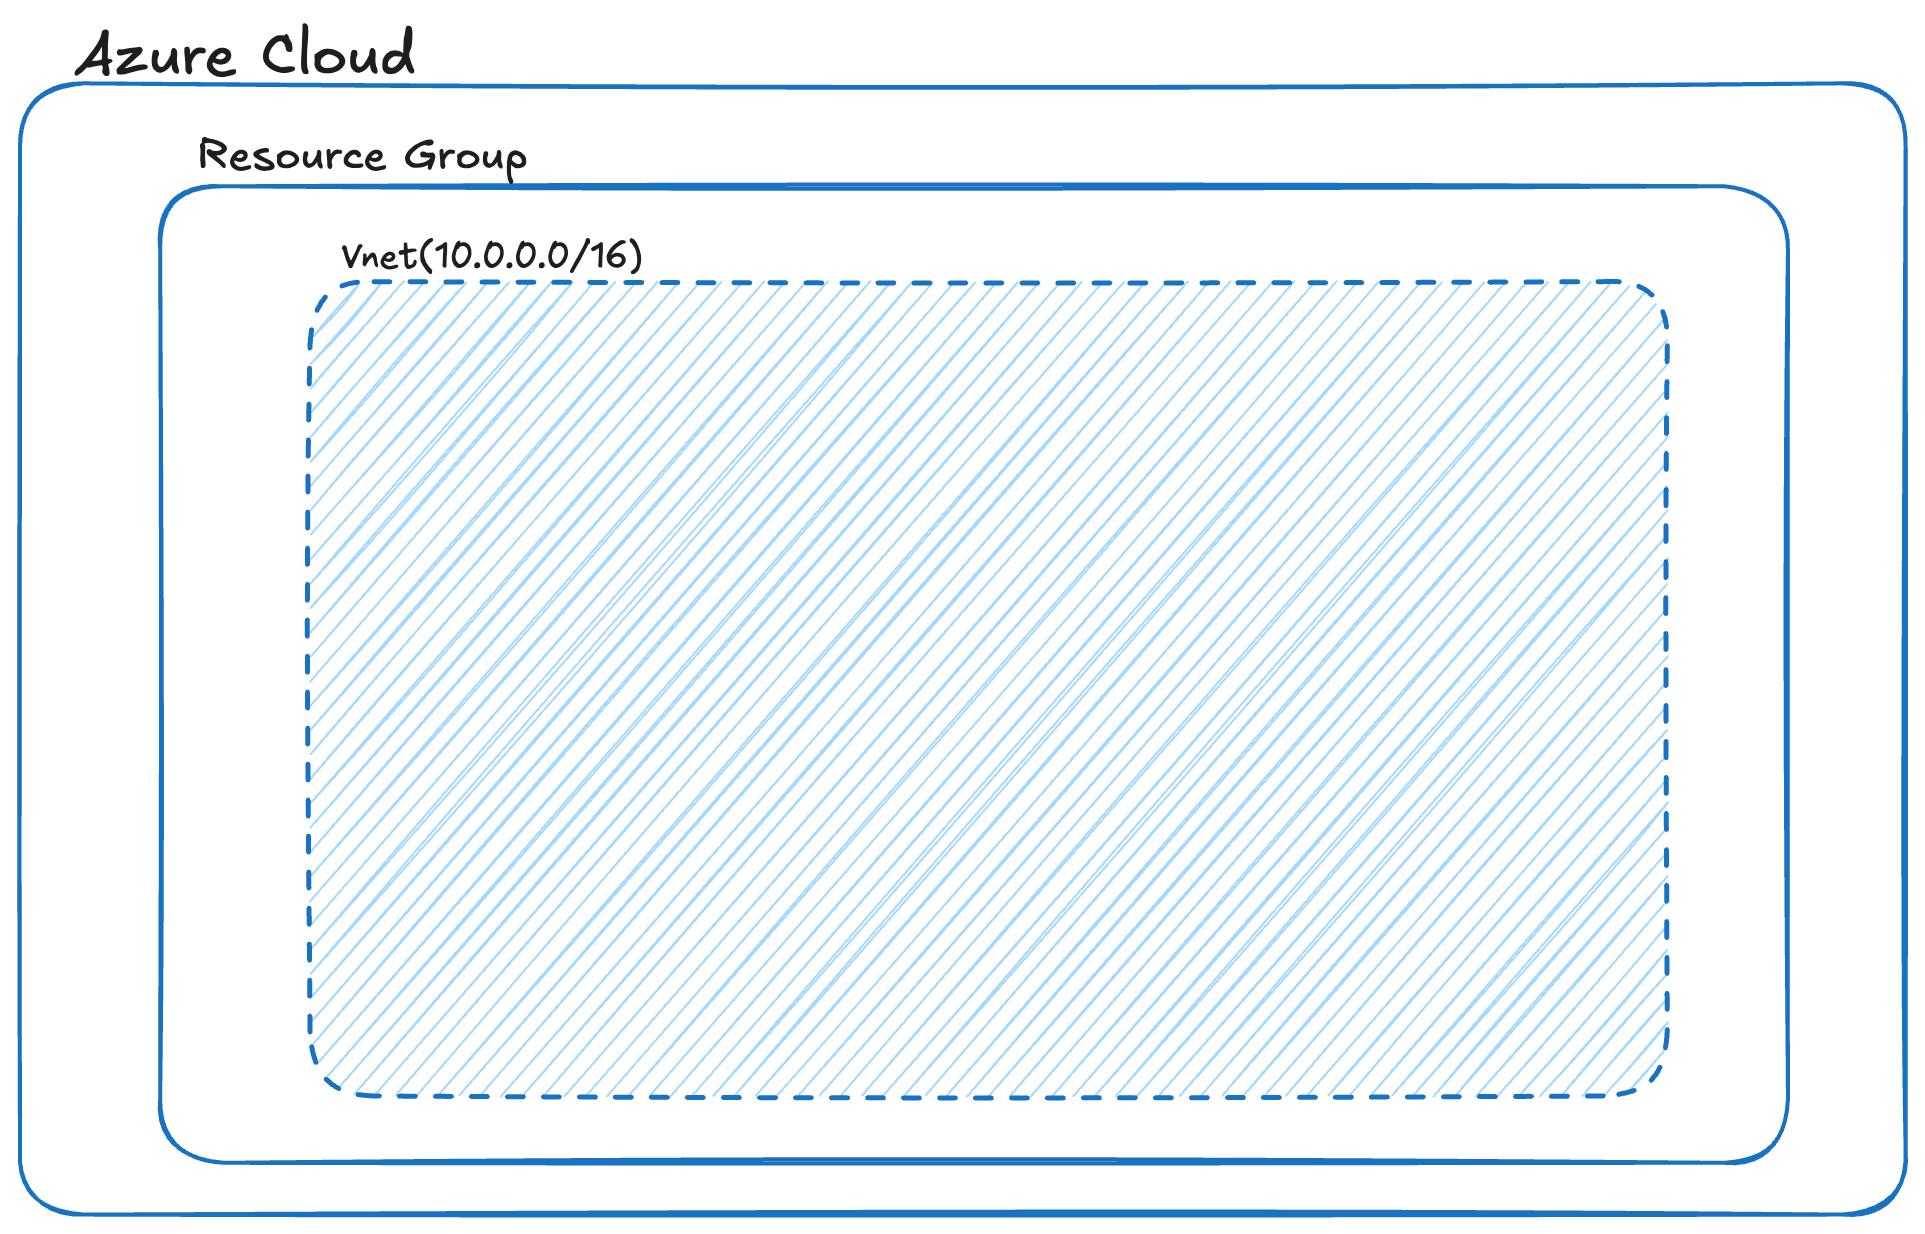
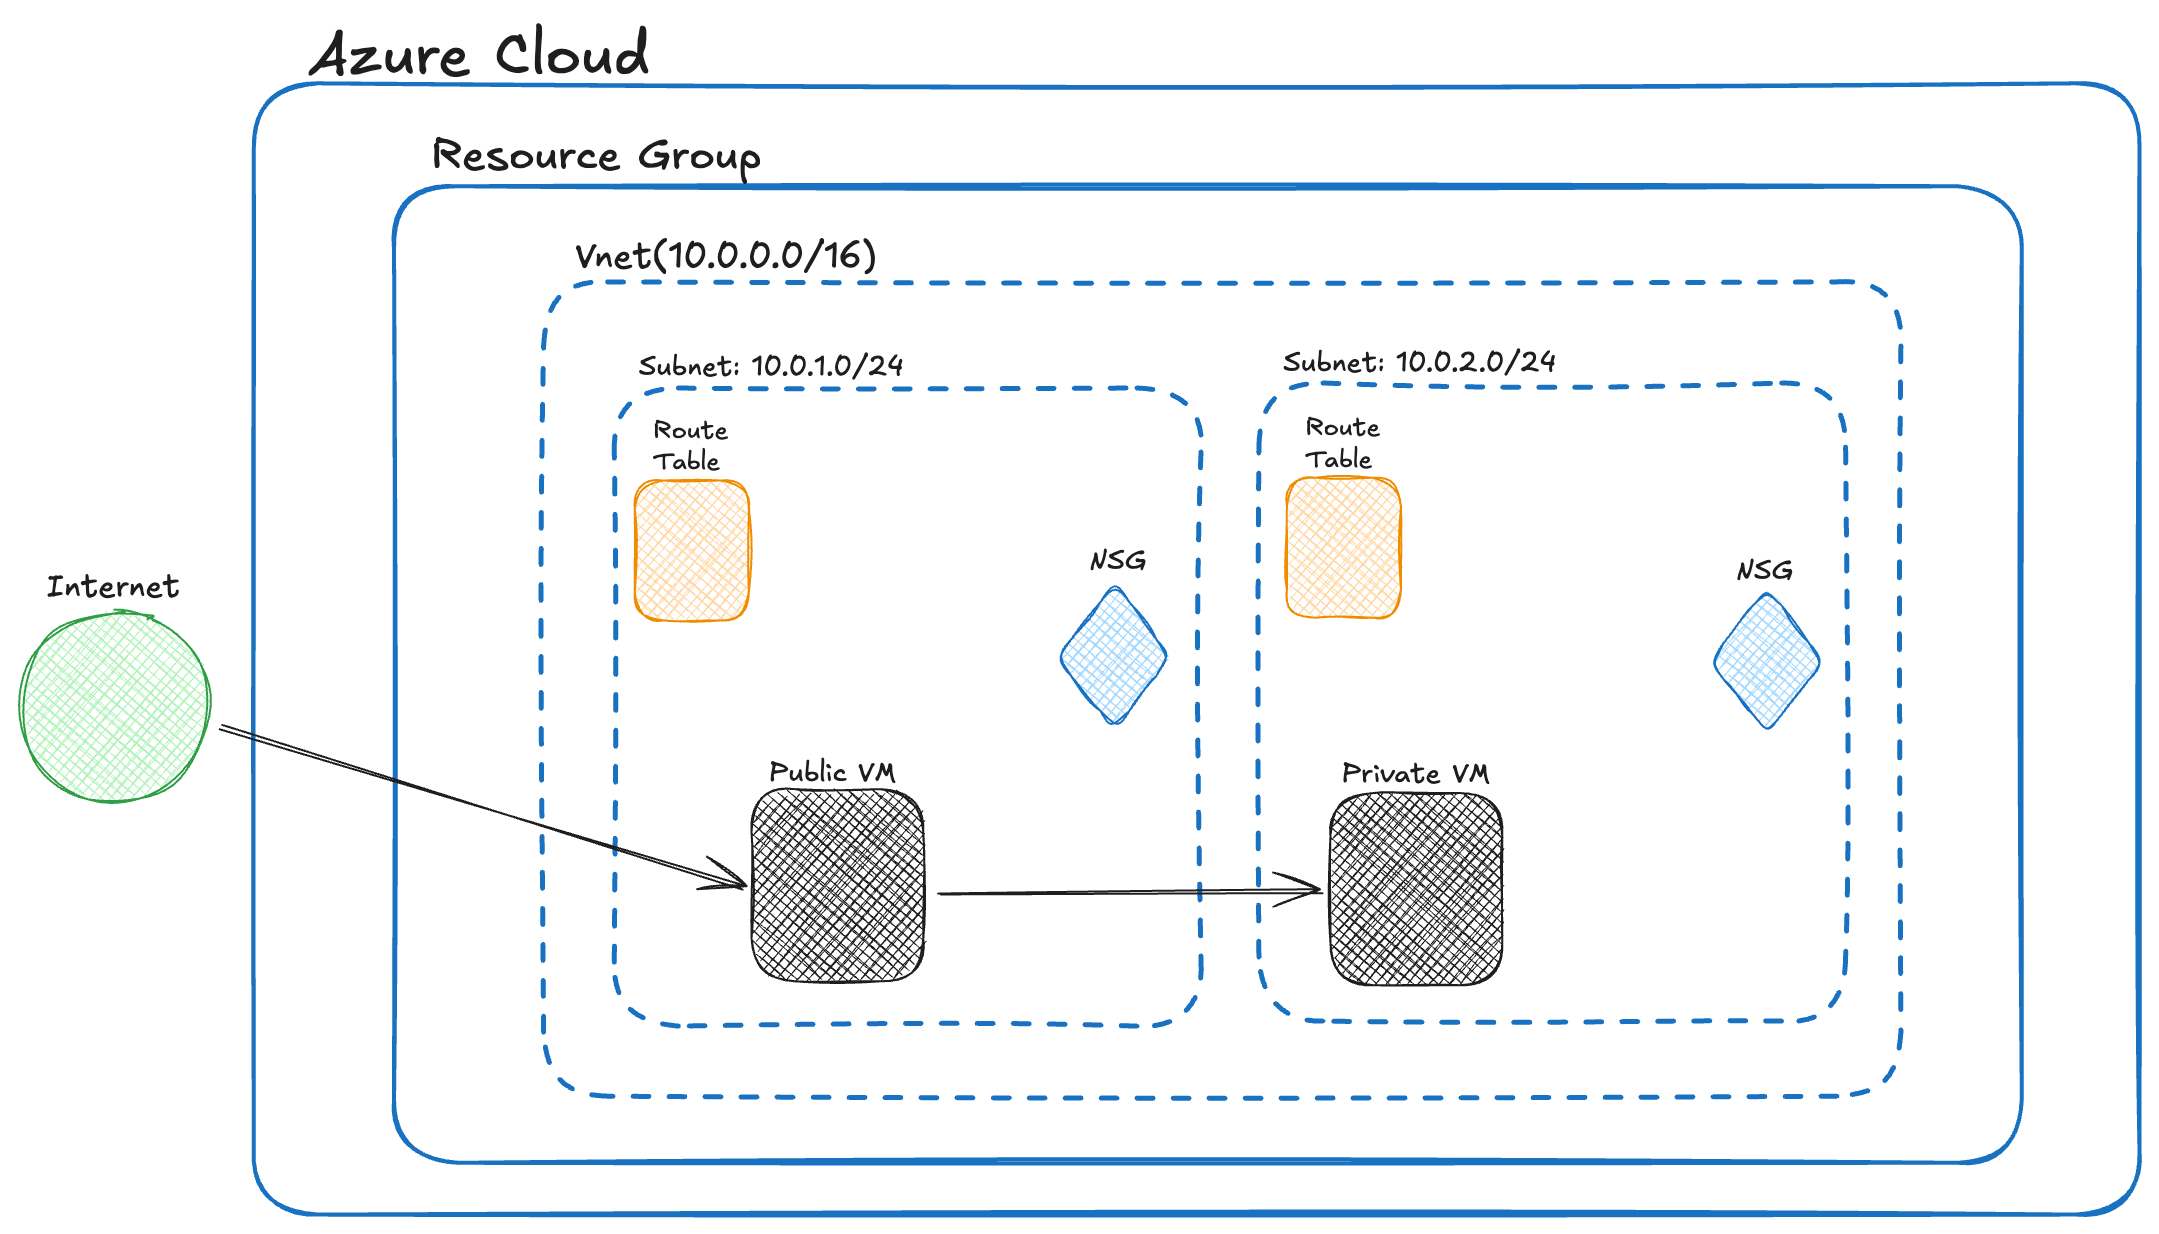
Step 3: Set Up a Virtual Network (VNet)
Create a Virtual Network (VNet) – your isolated network environment in Azure.
🛠️ Use an address space like 10.0.0.0/16 (65,536 IPs). This defines your network range for hosting subnets and resources.
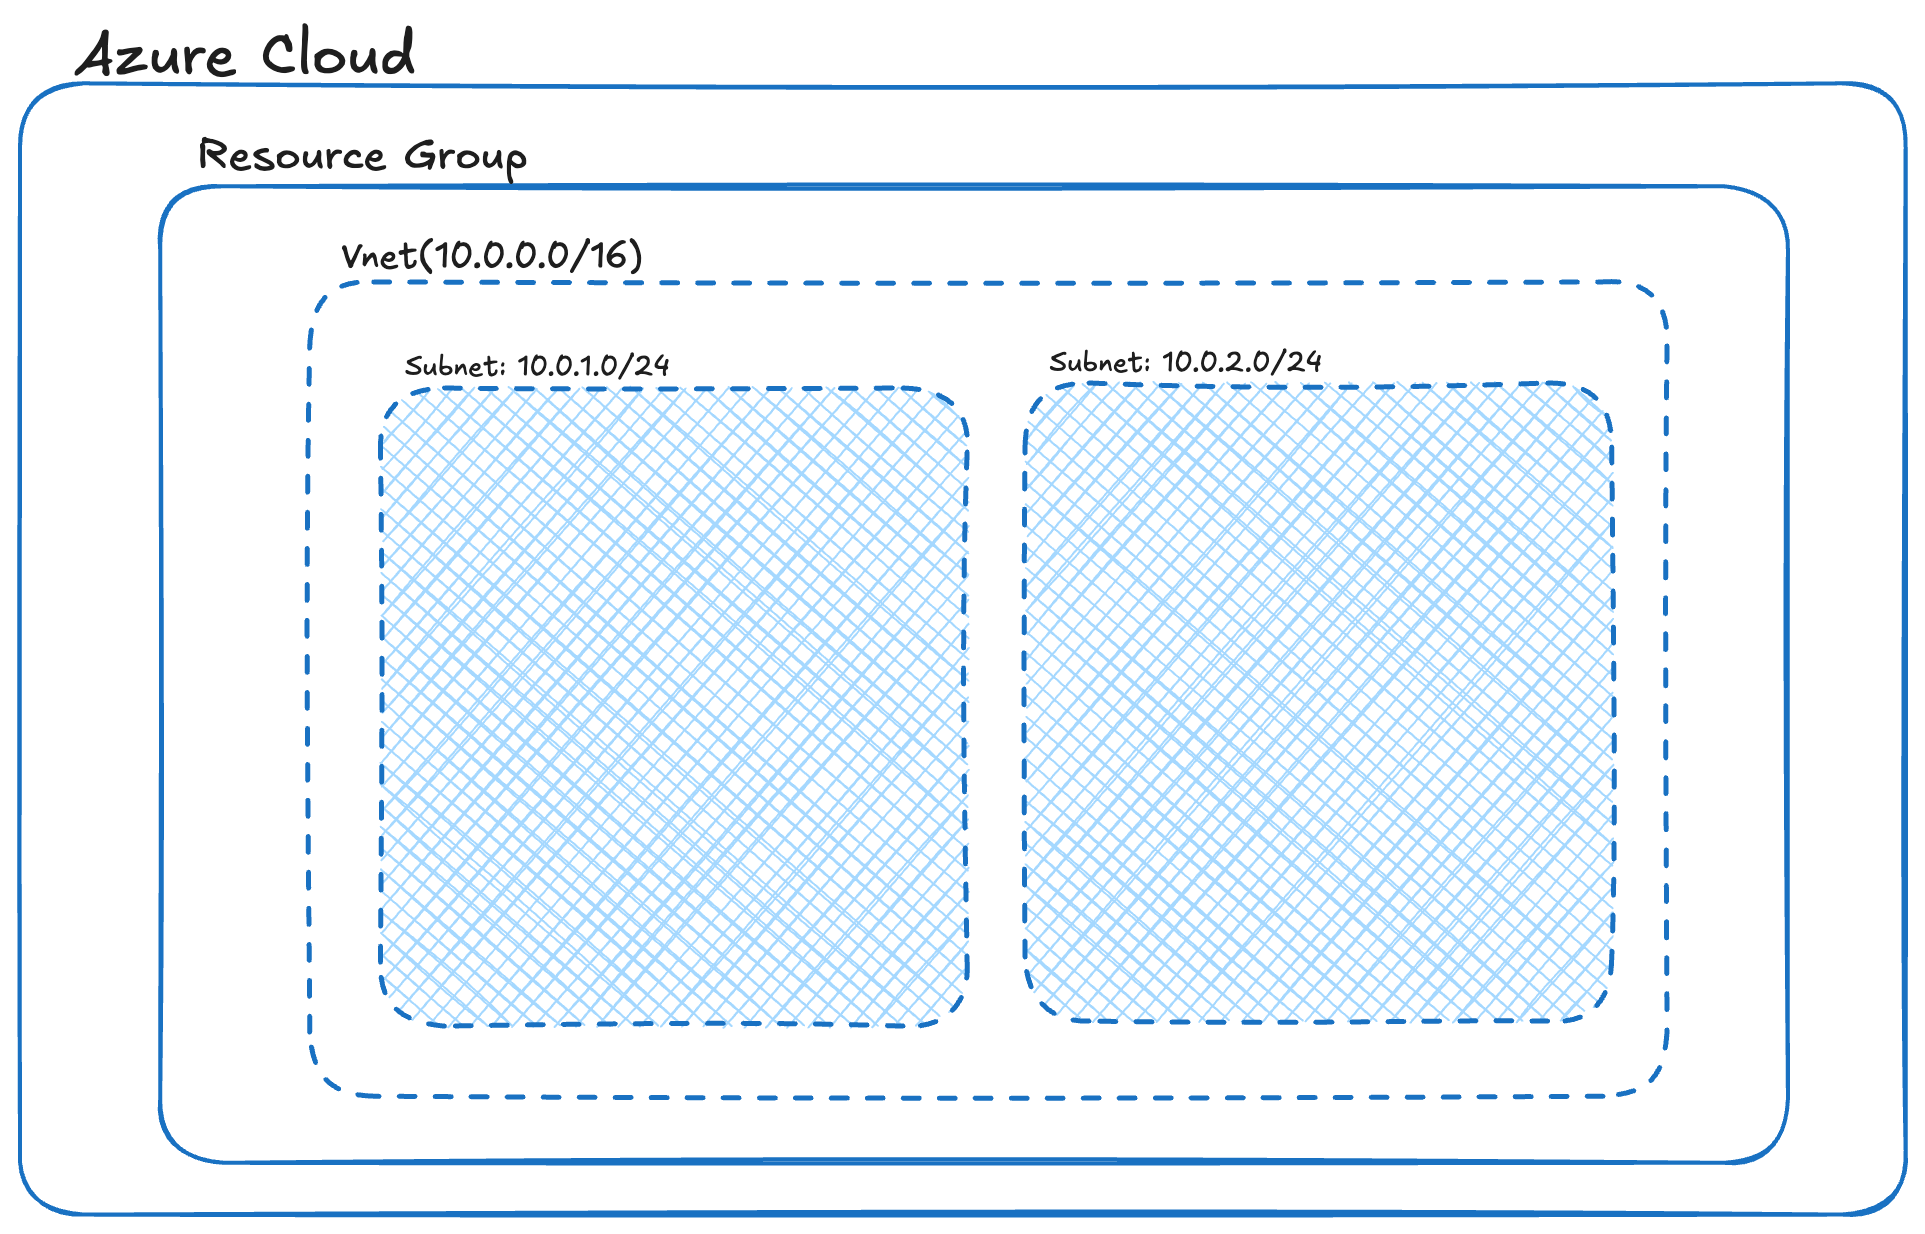
Step 4: Configure Subnets
Define two subnets within your VNet:
Public Subnet: for internet-facing resources like a jump box or web server.
Private Subnet: for backend resources like databases or internal APIs.
🛠️ Example:
Public Subnet: 10.0.1.0/24
Private Subnet: 10.0.2.0/24
🧠 In Azure, a subnet becomes “public” only if you associate it with a Public IP address and Network Interface.
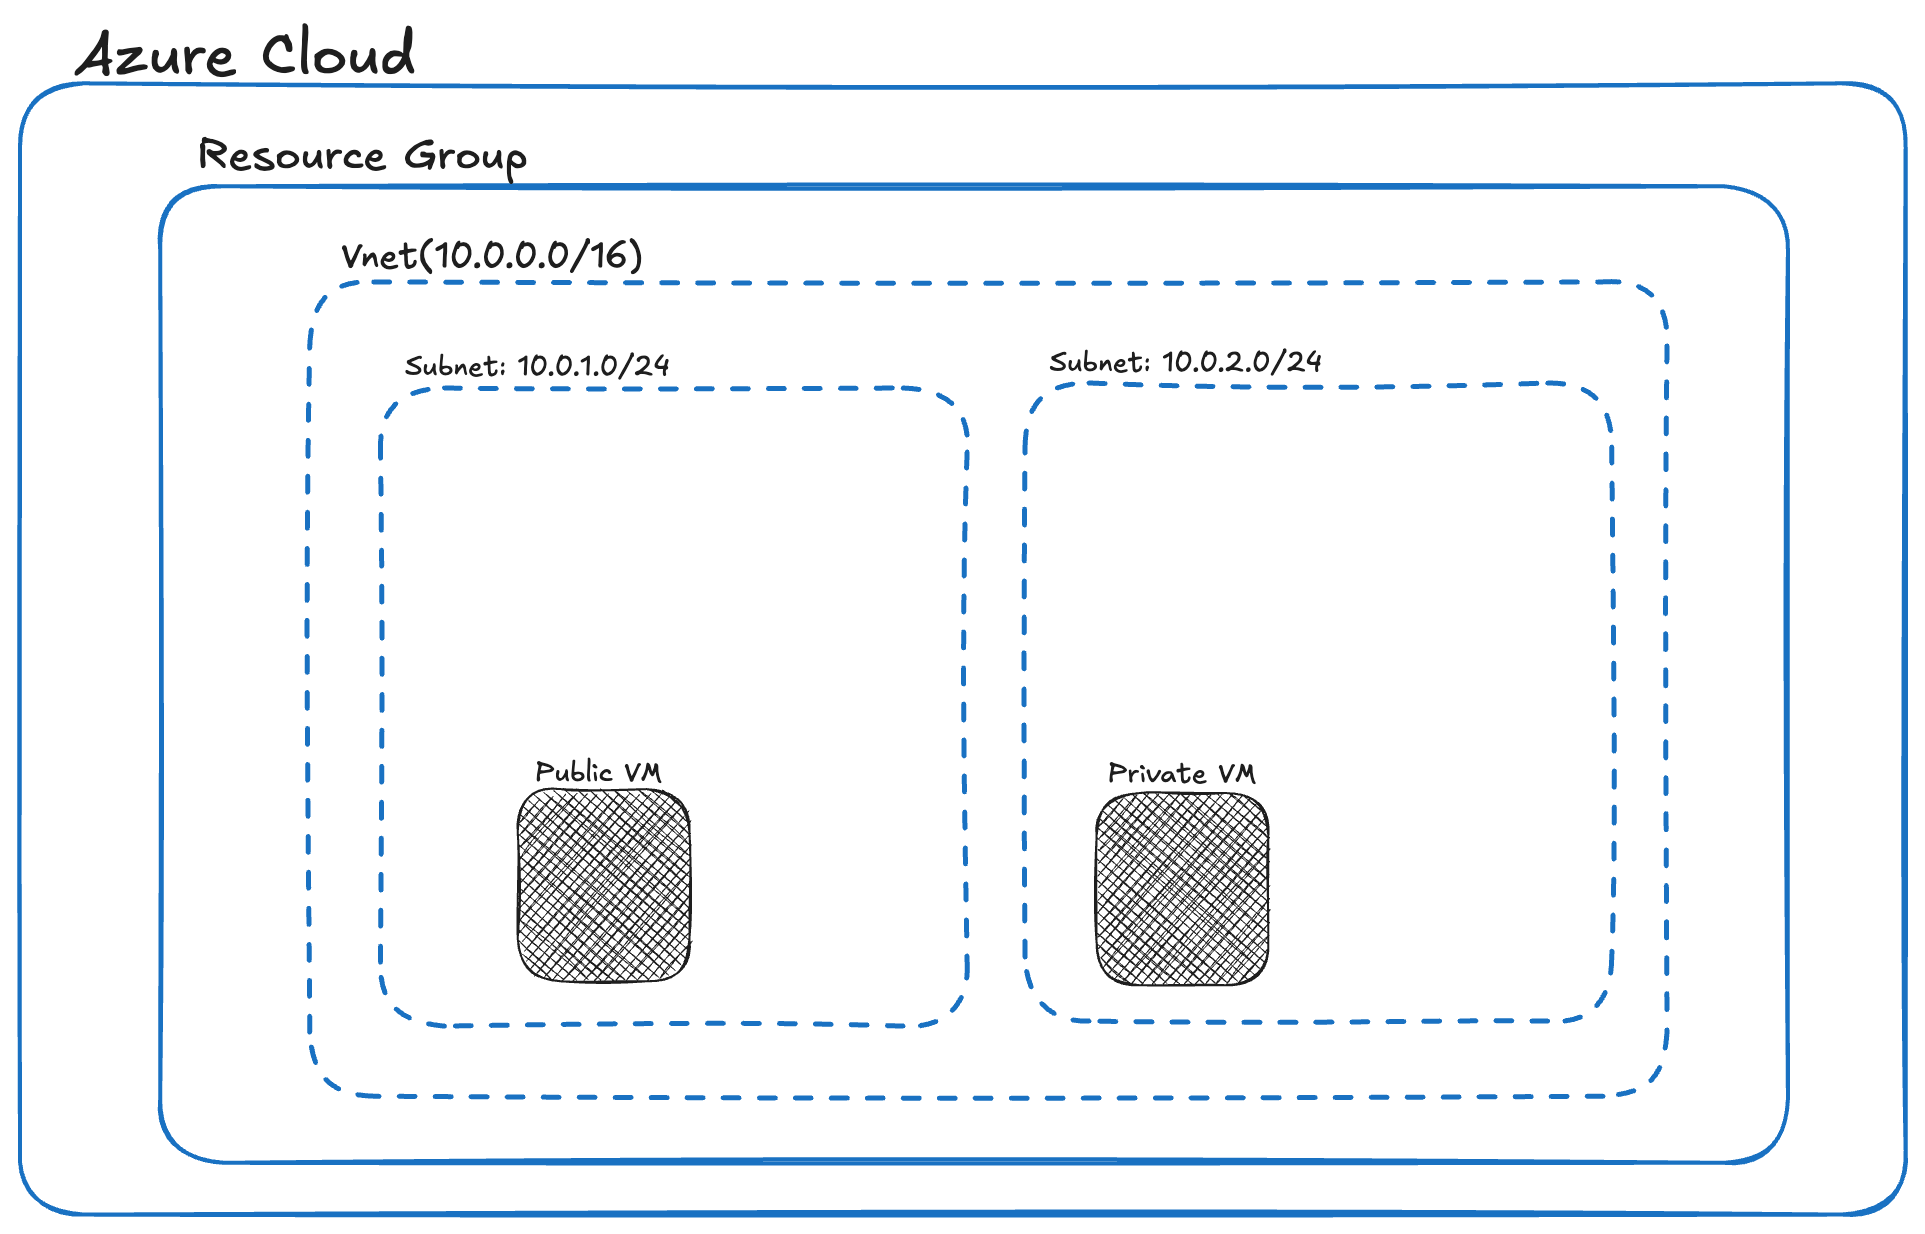
Step 5: Deploy a Virtual Machine (VM)
You’ll now launch two Linux Virtual Machines (VMs), one into your public subnet and one into your private subnet. This setup helps simulate real-world environments, like a jump box accessing an internal server.
In the Azure Portal, go to Virtual Machines and click Create.
Choose a basic image like Ubuntu 22.04 LTS and a region that matches your virtual network.
Under Authentication, select SSH key and generate a new key pair. Download and store the .pem file securely, you’ll need it to connect later.
For the public VM:
Choose your public subnet.
Assign a Public IP address so you can SSH into it.
For the private VM:
Choose your private subnet.
Set Public IP to None to keep it isolated.
You can leave most other settings as default. If you want to explore further, consider enabling:
System assigned Managed Identity for secure access to other Azure resources
Monitoring and Alerts using Azure Monitor
Custom Script Extension to run setup scripts automatically
Once both VMs are deployed, you’ll use the public one to connect to the private one via its internal IP.
Step 6: Secure Access with SSH Keys
Azure makes secure VM access simple with SSH keys. In this setup, you’ll use a jump box, a VM in your public subnet, to connect to a private VM that has no public IP. This is a great hands on alternative to managed solutions like Azure Bastion, which lets you connect to private VMs directly through the portal (recommended for production). But here, we’ll walk through doing it manually, a great way to understand how things work under the hood.
Step 1: Create SSH Key for the Public VM (Jump Box)
When creating your public VM in the Azure Portal, choose “Generate new key pair”.
Give it a name like my-public-vm-key.
Download the private key (.pem file) immediately: You won’t be able to access it later.
On your local machine, secure the key:
On Linux/macOS:
chmod 400 my-public-vm-key.pemOn Windows: Use Git Bash or WSL to run the same command, or convert the file to .ppk for use with PuTTY.
To SSH into your Public VM:
ssh -i /path/to/my-public-vm-key.pem azureuser@<public-vm-ip>Replace the path, username, and IP as needed.
Step 2: Set up access to the private VM from the public VM
When you created your private VM, you should have selected “Generate new key pair”. Now you’ll need to make the corresponding private key available inside your public VM so you can connect.
On your local machine, open the private key file you used for the private VM (for example, private-vm-key.pem) and copy the entire contents.
SSH into your public VM using the key for that machine:
ssh -i /path/to/my-public-vm-key.pem azureuser@<public-vm-ip>Once inside your public VM, create a new file and paste the contents of the private key into it:
nano ~/private-vm-key.pemPaste the key, save, and exit. Then secure the key file:
chmod 400 ~/private-vm-key.pemStep 3: Connect to the private VM from the public VM
Now use the key to connect to your private VM over its private IP:
ssh -i ~/private-vm-key.pem azureuser@<private-vm-ip>Replace azureuser and <private-vm-ip> with your actual username and internal IP address. You’re now inside your private VM without exposing it to the internet.
Step 7: Apply Network Security Groups (NSGs)
Attach NSGs to your subnets or network interfaces to control traffic:
Allow SSH (Port 22) to the public VM.
Block all inbound traffic to the private subnet except from trusted sources.
NSGs define inbound and outbound rules for IPs, ports, and protocols.
Step 8: Set Up Routing
Public Subnet (Internet Access)
To allow your public VM to access the internet:
Assign a Public IP to the VM’s network interface (if not already).
Azure automatically adds a system route:
0.0.0.0/0 > Internet
This allows the public VM to:
Be reached from the internet (via SSH or HTTP)
Access external resources (run updates, install packages)
What You've Built: Just the Beginning
Again this is essentially the networking plumbing that everything else sits on top of. This basic setup is your launchpad for the real Azure Defense in depth magic:
Web Application Firewalls for protecting your apps
Advanced Managed Identity scenarios for authentication
Content and Prompt filters for you AI Apps
Then get production ready with:
Containerised AI workloads that scale automatically
Hook it up to Azure AI Foundry where the serious AI development happens.
So let’s get you ready for the good stuff….For free!
Take It to the Next Level: Microsoft Build 2025 Session
Head over to the Recorded Microsoft Build 2025 sessions here to watch "Deploying an end-to-end secure AI application"
This comprehensive walkthrough shows you how to deploy a containerised application with enterprise grade security. The session includes:
Complete source code on GitHub
Step-by-step implementation guide
Best practices for secure AI deployment
Real world scenarios and use cases
Access the free recorded session here
This session will put you ahead of any other developer learning cloud security right now. The combination of hands on Azure foundation building plus the advanced Build 2025 content gives you everything you need to develop secure, scalable AI applications.
Why This Matters Now
As AI development accelerates, the developers who understand both the technology AND the secure infrastructure behind it will lead the field. Microsoft Build 2025 has shown us the future – now it's time to build the foundation that will get you there.
Start with this Azure project today, then dive into the Microsoft Build session to see how it all comes together in a real world, production ready AI application.
Ready to build the future? Your secure AI foundation starts now 🚀🚀🚀
Thank you for reading: Keep it secure, keep it light-hearted!
WJPearce - CyberBrew
Full transparency:
This issue was made possible thanks to Microsoft’s support. I only partner with companies I truly believe in, and what they’re doing here genuinely excites me. I’m in this for the long haul and I think learning this stuff will help you stand out.